Zoom Integration for Convene
Usage
Use Cases
- Start video conference with Zoom during board meeting in one click
- Managing recording during meetings
Prerequisites
- Must have a Convene Administrator account
- Must have a Zoom paid account
Setting up the Zoom Integration
- Log in to the Convene Portal as the System Administrator, navigate to System Admin, click Advanced, and then select Add under Linked Zoom Accounts.

- You will be redirected to the Zoom Login page. Enter the email address and password of the account you want to link to Convene, then click Sign In.

- Click Allow to confirm Convene’s access to your Zoom account. The option “Allow this app to use my shared access permissions.” can remain unticked.
Note: If you see the message:
“You cannot authorize the app”, you need authorization from the Zoom Administrator account.
See the topic Authorize Convene to access Zoom

- Allow hosts to add co-hosts who can help in handling the administrative side of the meetings, such as managing participants, starting/stopping recordings, and starting the waiting room. To enable this feature:
- Click the profile button
 , then click your name.
 - Go to Settings, then click the Meetings tab.
- Click In Meeting (Basic).
- Press CTRL + F or Command + F on your keyboard and type in “Co-host”, to easily find it.
- Toggle On, to enable the feature.
Note: These settings are only available to paid Zoom accounts. - Click the profile button

- In case participants have been accidentally removed during the meeting, you can allow removed participants to rejoin. To enable this feature:
- Click the profile button , then click your name.
- Go to Settings, then click the Meetings tab.
- Click In Meeting (Basic).
- Press CTRL + F or Command + F on your keyboard and type in “rejoin”, to easily find it.
- Toggle On, to enable the feature.
Note: For other Zoom account settings, please follow the default setting from Zoom and do not update them. - Click the profile button

- To allow apps to successfully join a Zoom AVC, the “Use Personal Meeting ID (PMI) when scheduling a meeting” setting must be disabled.
- Go to Settings, then click the Meeting tab.
- Under Schedule Meeting, look for “Use Personal Meeting ID (PMI) when scheduling a meeting” and toggle Off to disable the feature.
Note: For other Zoom account settings, please follow the default setting from Zoom and do not update them

- Language Interpretation allows participants to select their preferred language for real-time interpretation during the meeting. To enable this feature:
- Go to Settings, then click the Meeting tab.
- Click In Meeting (Advanced).
- Scroll down to “Language Interpretation” and toggle On to enable the feature.
When the interpretation feature is enabled, the option “Record active speaker, gallery view and shared screen separately” must be unticked to avoid duplicate meeting recordings. Disable the option by going to the Recording tab (next to the Meeting tab).
Notes:
- The Zoom account must be a Pro, Business, Education, or Enterprise account.
- Only default Zoom languages are supported, not custom languages.
- The interpretation session must be initiated in the Zoom native app by starting the Video Conference from the Convene App for Windows/Mac.
- Interpreters need to use the Zoom invite email and should match the signed in account in the native Zoom app to join the session.
- Once interpretation session is started, participants on iOS, Android, and Windows/Mac Convene Apps can select the interpretation channel to listen to.

- Meeting Summary with AI Companion allows organisers to initiate an AI-generated summary of their Zoom Meeting. To enable this feature:
- Go to Settings, then click AI Companion tab.
- Under the Meeting section, toggle On “Meeting summary with AI Companion“.
- Untick “Send an email notification when sharing with users“.
- Under Automatically share summary with, select “Only me (meeting host)“.
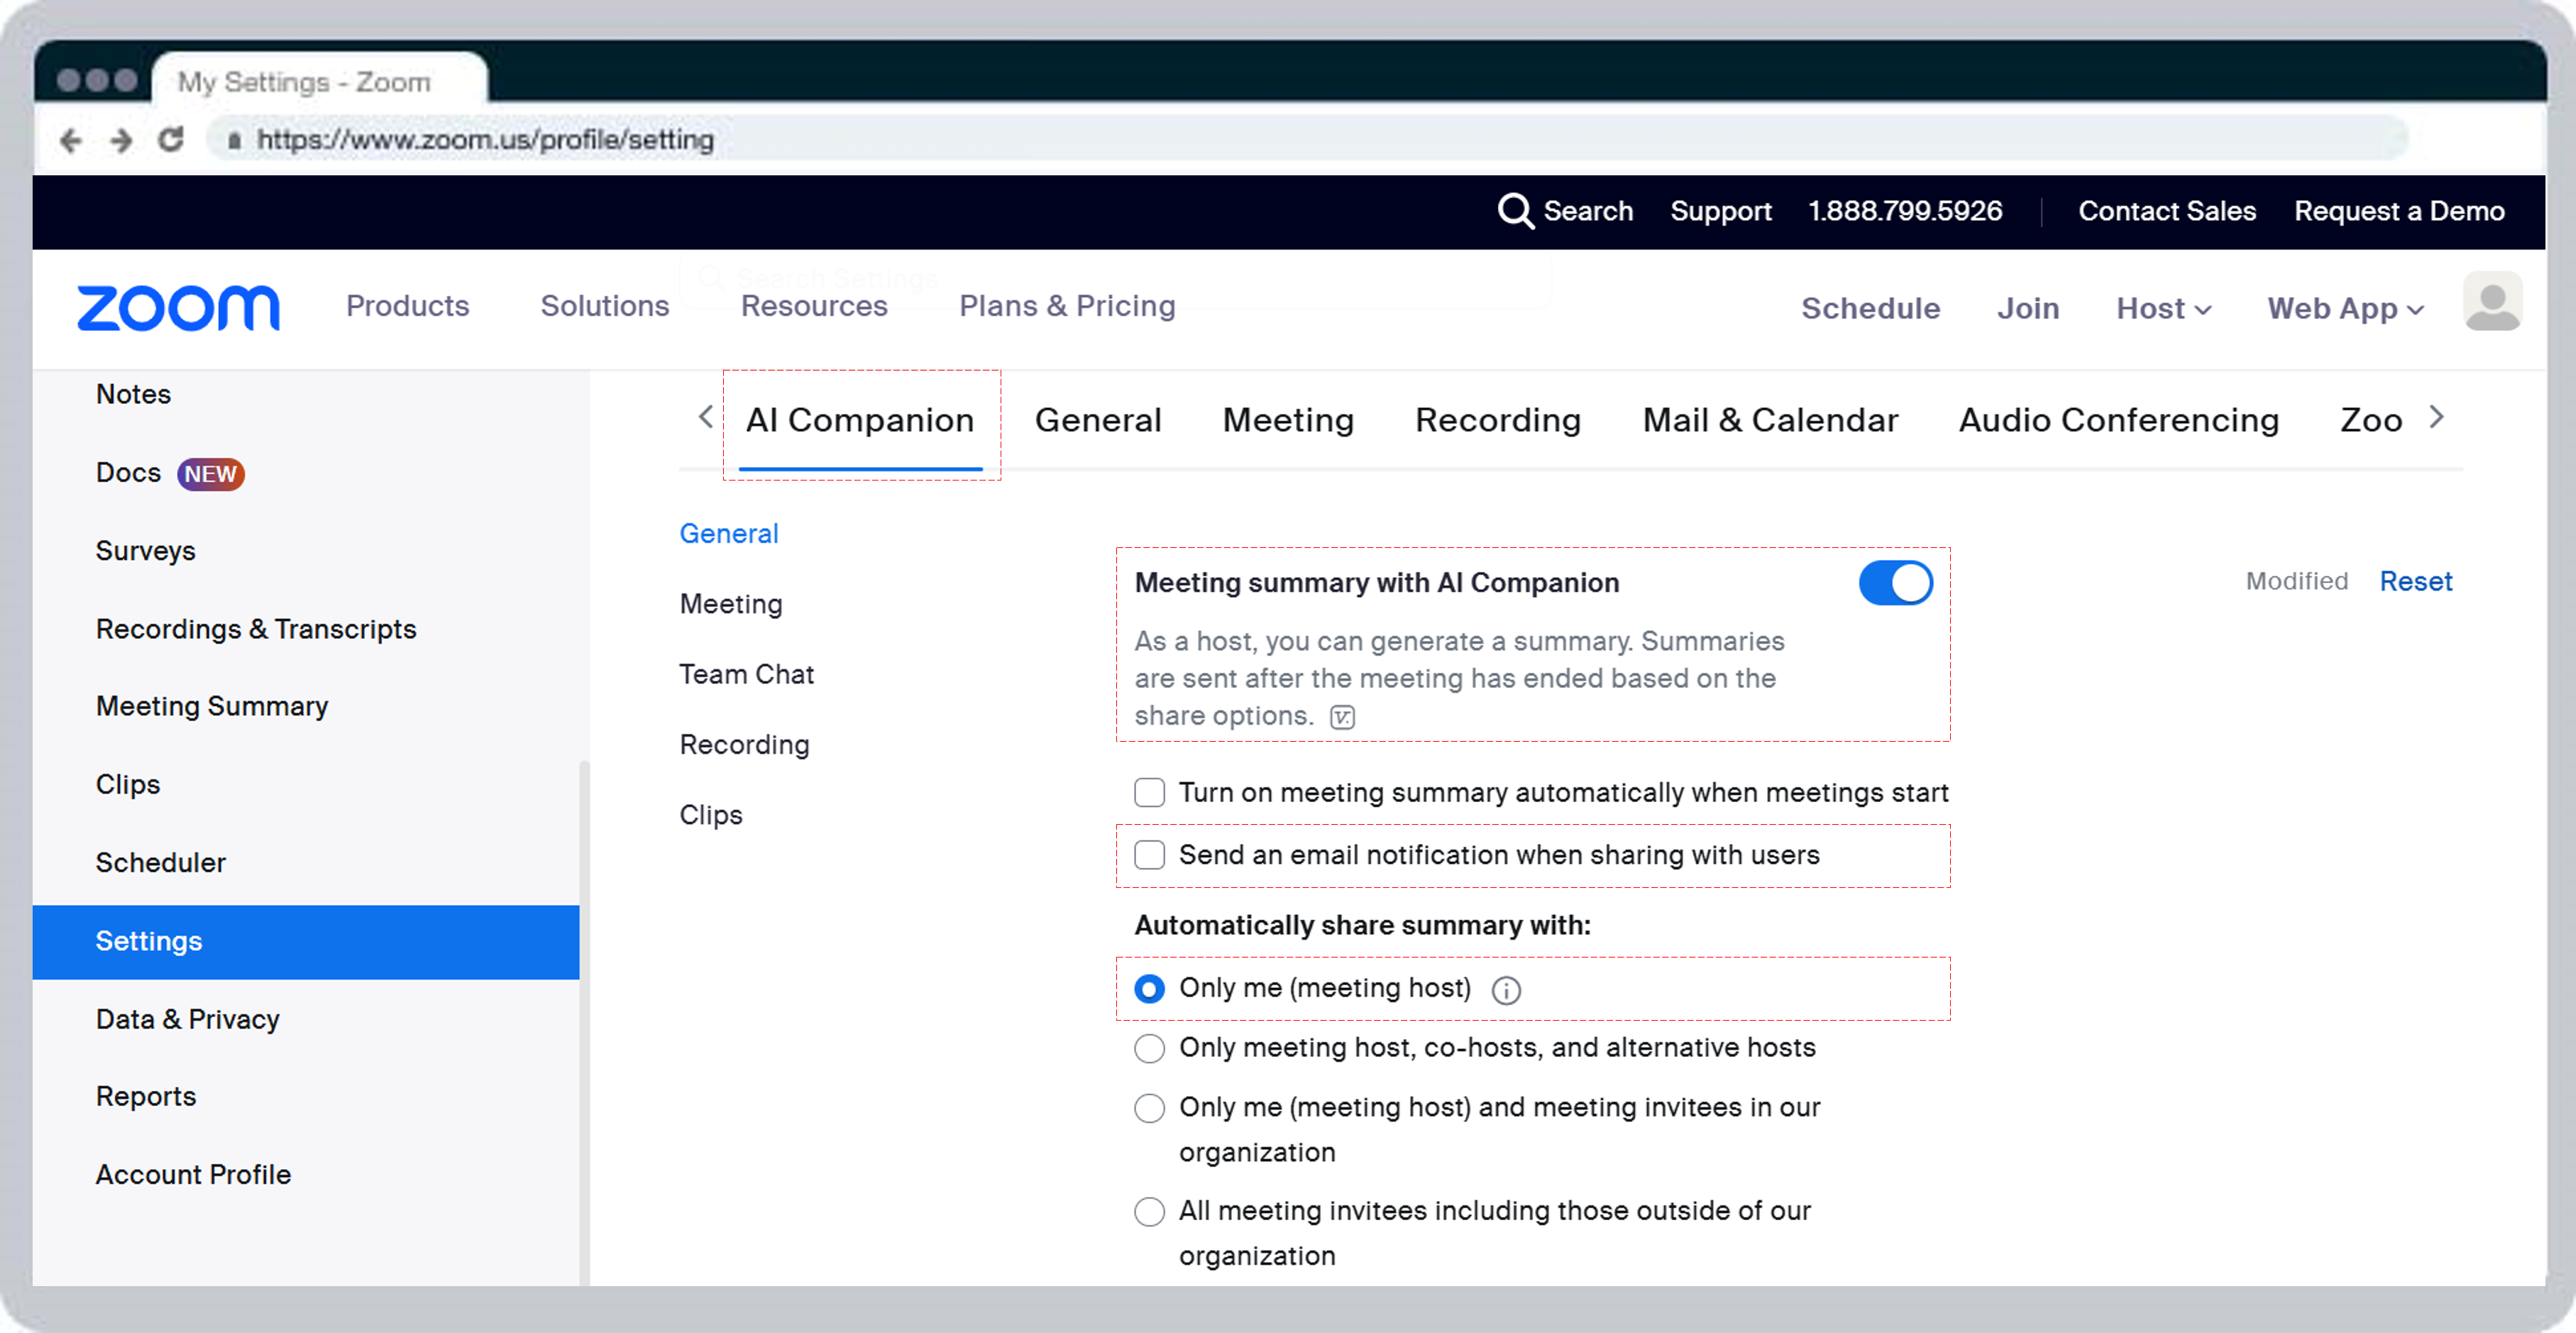
- You should be able to see the email address of the linked account in “Linked Zoom Accounts” in Convene Portal.Notes:
- Re-linking the Zoom account may be required to access Meeting Summary. Click the Relink button to be redirected to the Zoom login page, similar to the Add button when initially linking a Zoom account.

Authorize Convene to access Zoom
If you see the message: “You cannot authorize the app”, you need authorization from the Zoom Administrator account.

- Go to the app’s page in Zoom Marketplace and click Request Pre-approval.

- The administrator will receive an email containing the request approval. After completion, you should repeat the process from step 1 and you should be able to authorize Convene.

- Admin account can also directly enable pre-approval for an app.

Start Zoom Video Conference in Convene
The built-in video conferencing feature of Convene makes collaboration more effective and engaging as directors can see and hear one another in a meeting. Video conferencing can be started by the meeting organiser only.
- Tap More Options
 on the toolbar.
 - Tap Start Video Conferencing.

Turn on video camera and microphone
After starting the video conferencing, the participants will get a prompt on Convene app to turn on their video camera and microphone.
- Click/Tap Turn On to enable video camera and microphone right away. Otherwise, select Later.

Manage video camera and microphone
- To enable or disable your microphone anytime during the meeting, click/tap the Mic button
 .
. - To enable or disable your video camera anytime during the meeting, click/tap the Video button
 .
. - Your microphone is disabled if it shows
 .
. - Your video camera is disabled if it shows
 .
.

Meeting Recordings
Record meetings
- Tap More Options on the toolbar.
- Tap Start Recording to start a recording of the meeting.

Download meeting recordings
- Go to the Convene Portal and click on the meeting to access meeting files and recordings.
- On the Meeting Details page, click More Options and select Meeting Recordings.
- Select the recording and the type you want to download.

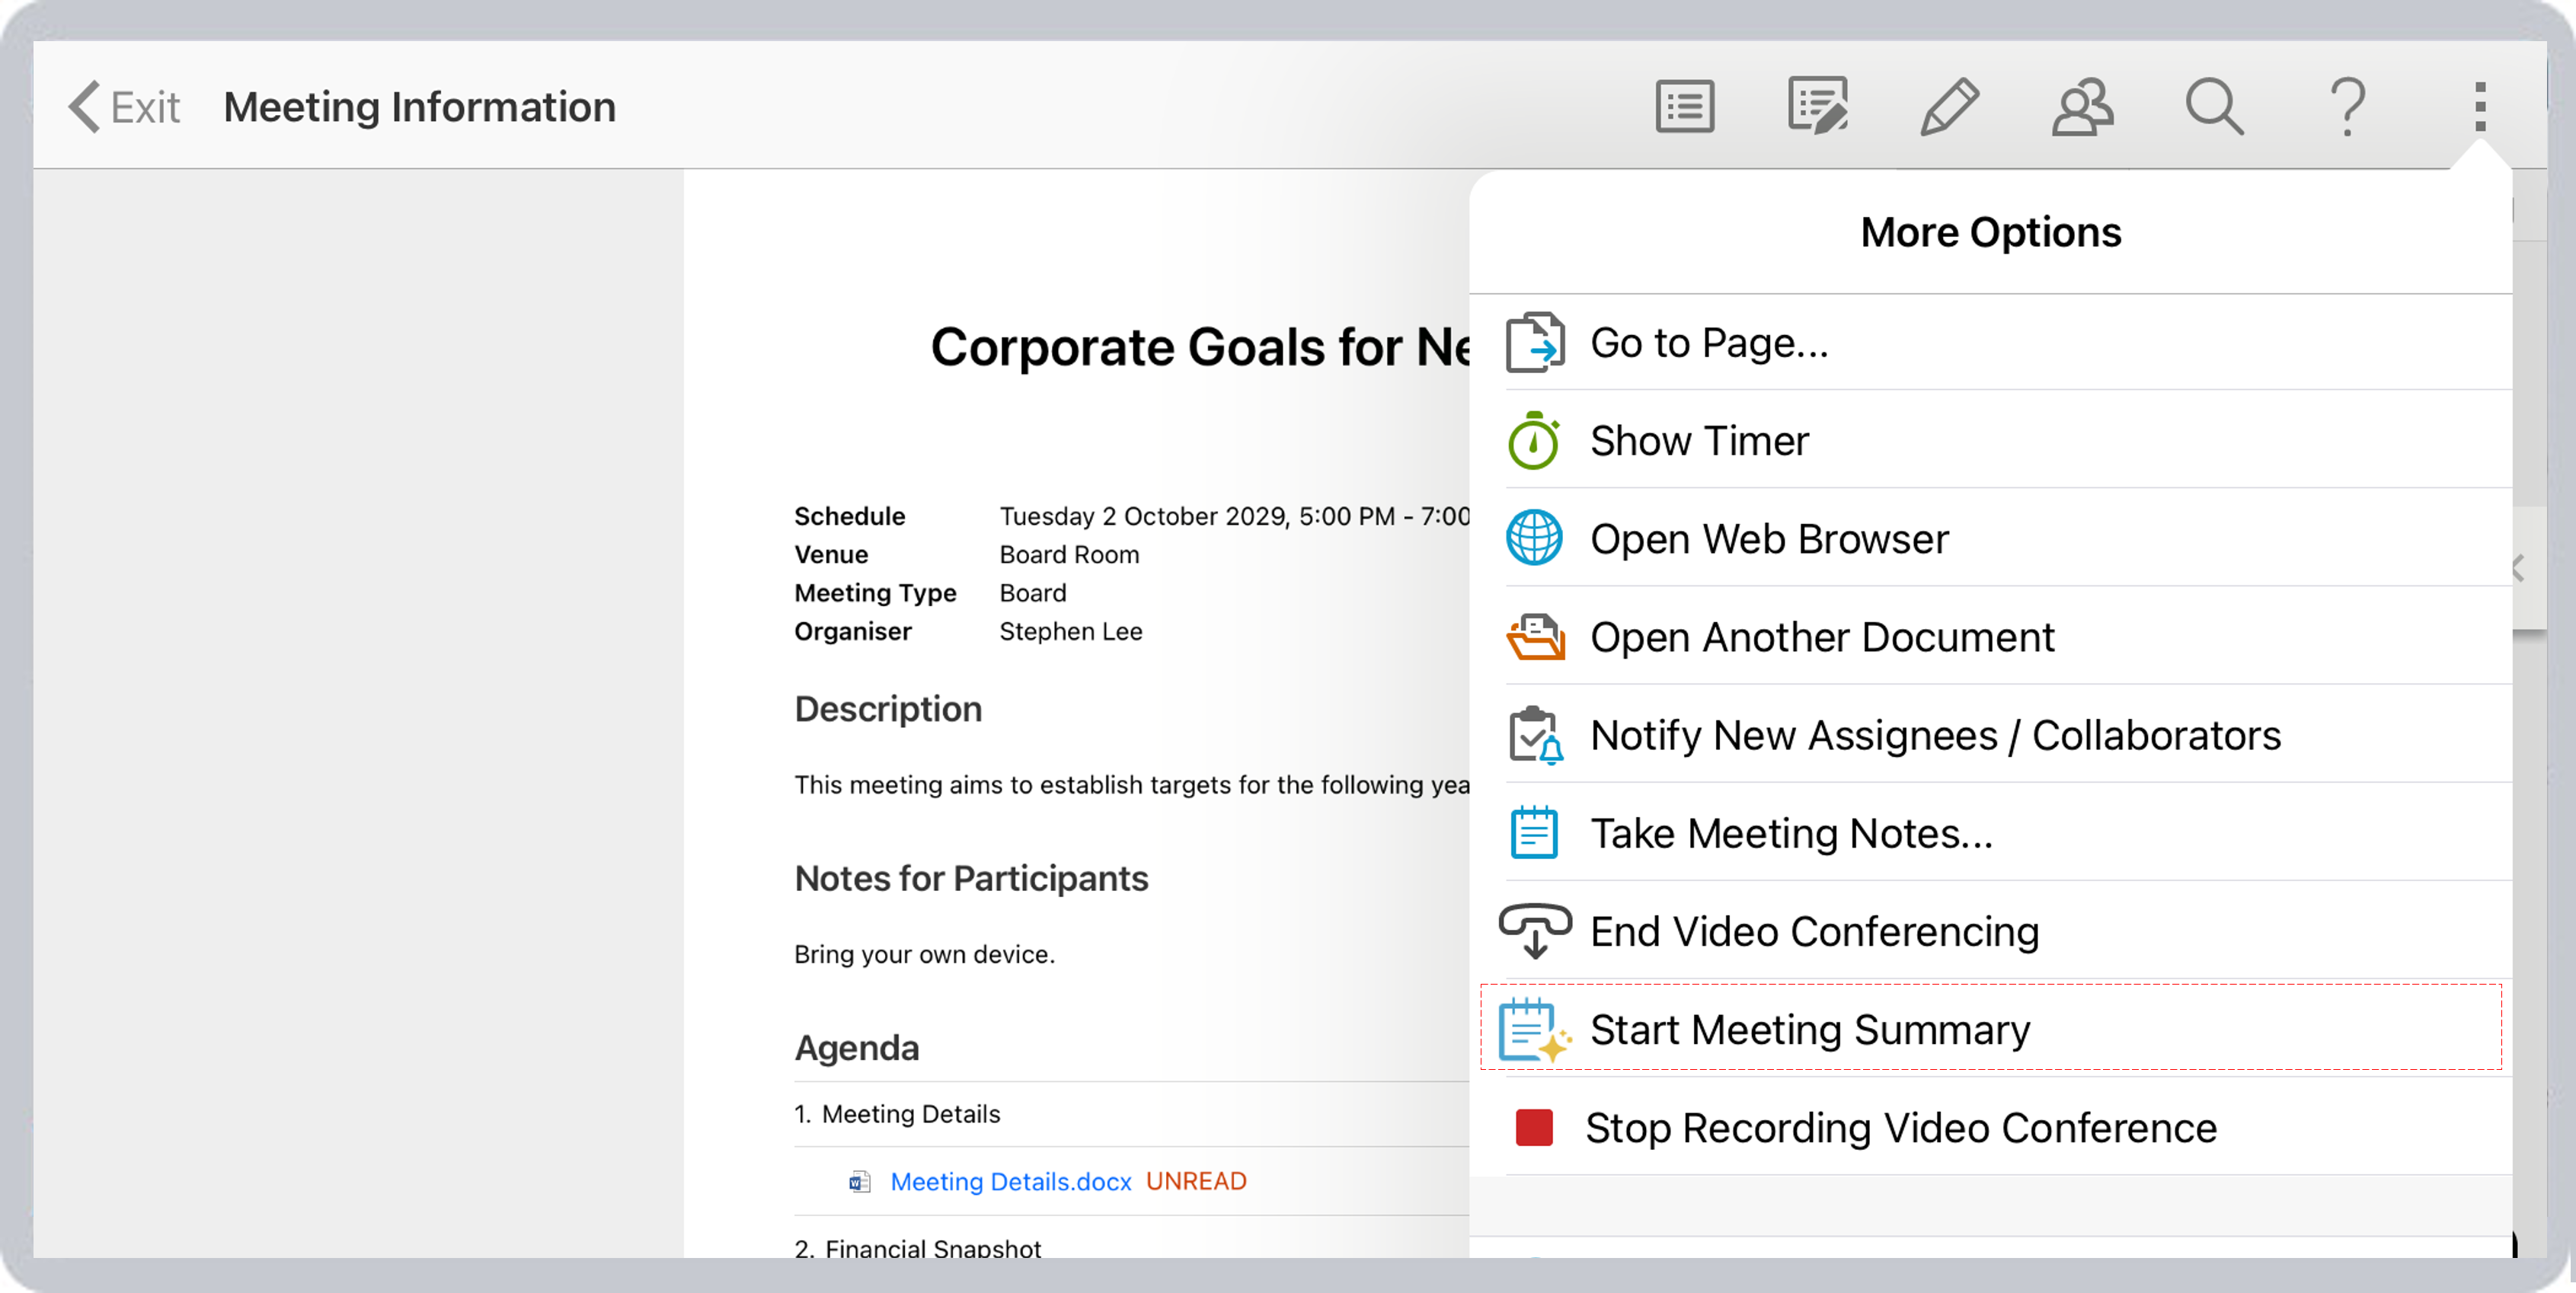
Meeting Summary
Start/Stop Meeting Summary
- In Convene App for iOS or Android, tap More Options on the toolbar.
- Tap Start Meeting Summary.
- To end generating the summary, tap Stop Meeting Summary.
- The Start and Stop Meeting Summary options are only available on iOS and Android; the native Zoom app is required to start a meeting summary on Windows or Convene Web.

Download meeting summaries
- Go to the Convene Portal and click on the meeting to access the related Meeting Summary.
- On the Meeting Details page, click More Options
 and select Meeting Summary.
 - Select the Meeting Summary you want to download.


Unlink Zoom account to Convene
- Log in to your Zoom Account and navigate to the Zoom App Marketplace.
- Click Manage, then click Added Apps or search for the Convene App.
- Click Remove next to Convene.
- (Optional) Select the reason for removing.
- Click Remove.
